Cub Cadet 2X 24 31AM5HVRB10 Auger Keeps Spinning After Release: Stop-Use Cable Check
A safety-first exact-model path for auger motion after release, using the 31AM5HVRB10 manual set, single-hand-control context, released cable slack and Cub Cadet’s zero-motion verification.
Applies to 2X 24 IntelliPOWER (31AM5HVRB10)
Identifiers: 31AM5HVRB10 · 2X 24 IntelliPOWER
Engine ID: 875-W0
Guide scope: Applies to Cub Cadet 2X 24 IntelliPOWER model 31AM5HVRB10, whose official product page lists 31X 500/600/800 operator manual form 769-26795 and single-hand operation. The auger-control adjustment used here comes from Cub Cadet’s 31X setup/adjustment procedure: released cable has very little slack but is not tight, and any auger motion after release fails the safety check.
Cub Cadet identifies this exact machine as 31AM5HVRB10. The product ID is 11 characters and is printed on the Product Identification Label.
Failure to stop vs. failure to engage
Use this page when the auger continues moving after both controls are released. If the auger does not rotate when commanded, use the separate auger-wont-engage path; do not use an engagement adjustment as a reason to accept residual rotation.
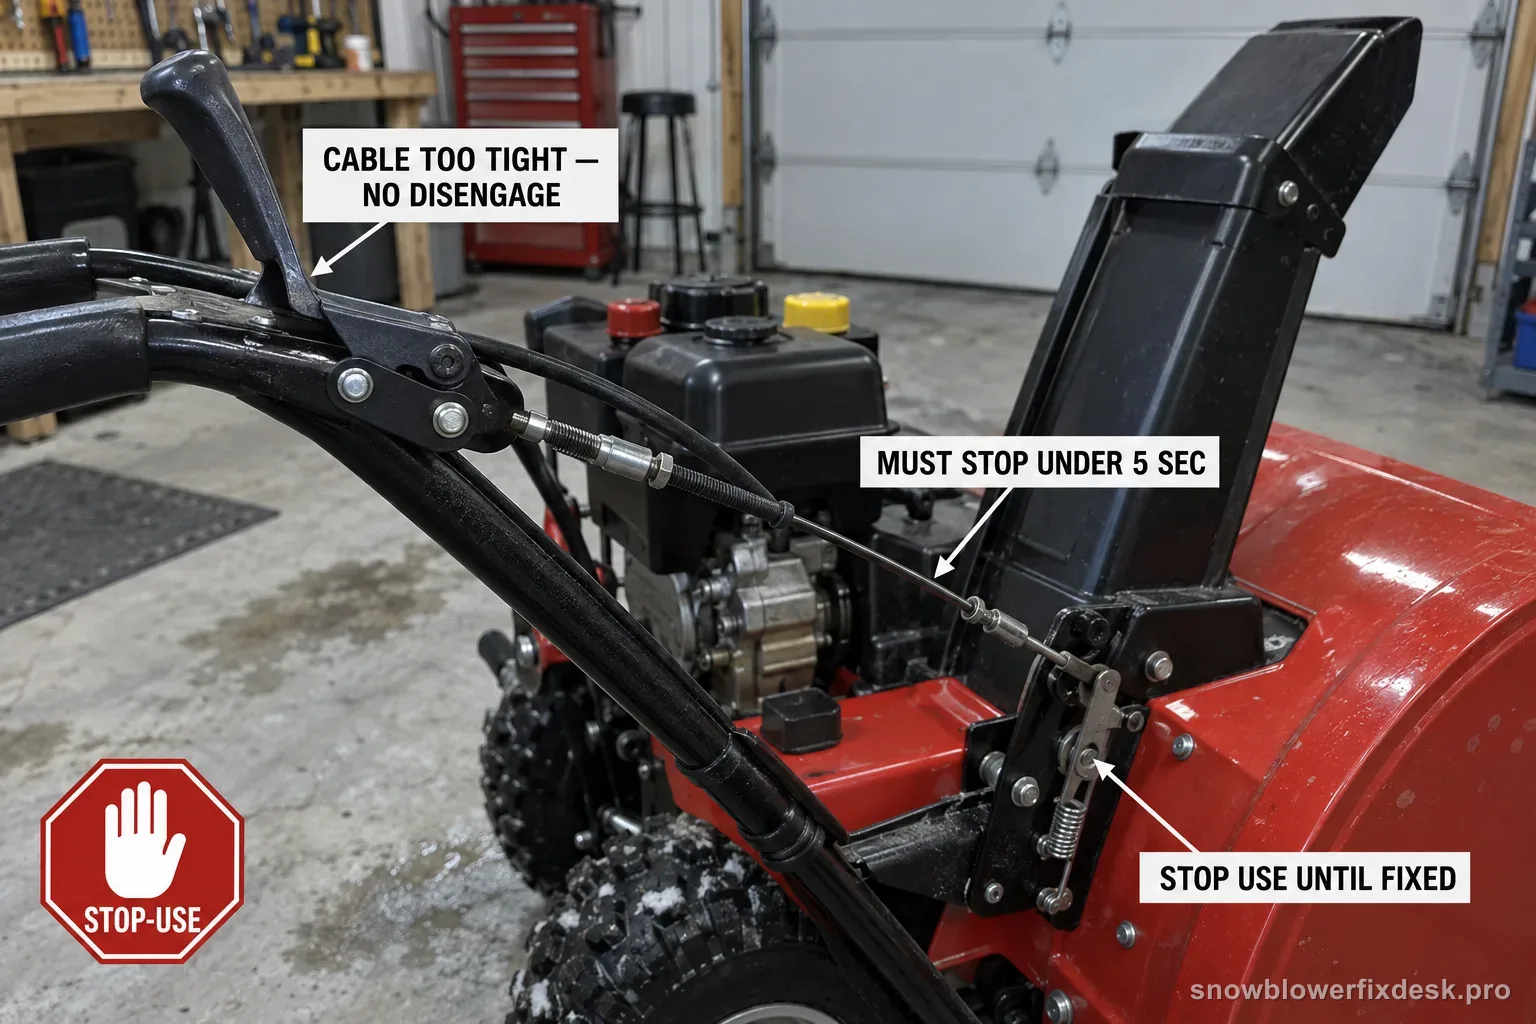
Do not treat continued auger rotation as harmless coast-down. First make sure the control system is truly released, then use Cub Cadet’s check: after repeated engagement/release cycles, the auger must be completely stopped with no sign of motion. If it still turns, shut the engine off immediately and add cable slack only through the documented bracket adjustment; if safe release and reliable engagement cannot both be achieved, stop adjusting and use service.
An auger that still moves after the controls are released is a stop-use fault. Shut off the engine, remove the safety key or disconnect the spark-plug wire, and wait for all moving parts to stop before any cable, belt or housing inspection. Never approach the front of a running machine while the auger is moving.
Diagnostic sequence
Work in order. The early checks are intentionally low-disassembly and model-specific; stop once the symptom changes or the fault is confirmed.
Verify the exact model and manual set first
Why this check: 31AM5HVRB10 has a current Cub Cadet product page with operator manual form 769-26795; similar 2X machines can share styling while differing in equipment and supplemental instructions.
What to do: Read the 11-character Product Identification Label and confirm 31AM5HVRB10. Keep the serial number with the model when using the manual resolver.
Release the control system fully before timing the stop
Why this check: Cub Cadet lists single-hand operation as standard on 31AM5HVRB10, so judging auger behavior while another control is intentionally holding the interlock can confuse normal control logic with a failure to disengage.
What to do: From the operator position, release both the auger and drive controls so no single-hand/interlock function is intentionally maintaining attachment engagement. If the auger then stops, the original observation may have been control logic rather than a stuck clutch.
Inspect released auger-cable slack with the engine off
Why this check: Cub Cadet’s adjustment procedure says the auger-control cable should have very little slack in the released UP position, but it should not be tight.
What to do: Disable the machine and inspect the visible control cable/bracket. If the cable is taut with the lever released, do not increase tension; the release side of the adjustment is already suspect.
Perform the documented engage-release conditioning cycles
Why this check: Cub Cadet has the operator engage the auger for about ten seconds and release it several times before judging the adjustment.
What to do: In a well-ventilated open area, with everyone clear, run the test from behind the handles. Do not walk in front until the control is released and the auger has visibly stopped.
Require zero visible auger motion after release
Why this check: The Cub Cadet procedure does not give a generous coast-down allowance; it says the auger must be completely stopped and show no signs of motion.
What to do: With the control released, observe from a safe position. If any rotation remains, immediately shut the engine off, remove the safety key or disconnect the spark-plug wire and wait for every moving part to stop.
Move the cable bracket upward only to add needed slack
Why this check: The documented bracket adjustment says upward provides more cable slack while downward increases tension.
What to do: With the machine disabled, loosen the specified bracket screws and move the bracket only enough in the documented direction to restore released slack. Tighten the screws and repeat the complete stop check.
Do not fix stopping by creating a no-engagement problem
Why this check: The correct setting must release fully and still engage the auger under command. Excess slack may stop residual drive but leave the attachment unable to transmit power.
What to do: After zero-motion release is achieved, confirm normal engagement from the operator position. If the auger now hesitates, slips or will not engage, use the separate auger-wont-engage diagnosis rather than continuing to move the bracket back and forth blindly.
Escalate when safe stop and reliable engagement cannot coexist
Why this check: A cable that cannot be adjusted to satisfy both states may be damaged, misrouted or masking a deeper belt/control problem.
What to do: Stop using the snow blower. Record model 31AM5HVRB10, serial, whether the cable was tight when released and which adjustment direction changed the symptom, then use Cub Cadet service rather than accepting any residual auger motion.
How to read this symptom on this model
The first job is to distinguish an intentionally held control from a true failure to disengage. Cub Cadet lists single-hand operation as standard equipment on exact model 31AM5HVRB10. That feature exists so the operator can manage another control while drive/attachment functions are coordinated, and it can confuse a casual “I let go of one lever” observation. For the safety test, release both operator controls so no interlock is deliberately maintaining engagement. Continued auger motion after that point belongs to the stop fault; rotation that ends when the second control is released may be normal control logic.
Cub Cadet’s adjustment standard is stronger than “the auger slows down eventually.” In the 31X setup procedure, the released auger-control cable should have very little slack and should not be tight. After the operator engages for about ten seconds and releases several times, the procedure requires the auger to be completely stopped with no visible motion. If any rotation remains, it directs immediate engine shutdown and disabling before adjustment. That zero-motion result is the release criterion used throughout this page.
Cable tension can create opposite symptoms depending on direction. Too much released tension can prevent complete disengagement, while too much slack can cause weak or missing engagement. That is why “tighten the cable” is not a universal cure for an auger problem. For a no-stop complaint, first inspect whether the cable is taut with the lever released. The documented bracket direction is upward for more slack and downward for more tension. The final setting is accepted only after both stop and engagement behavior are tested.
Control cycling before measurement matters because a cable and belt can settle into their working position after several engagements. A one-time cold observation can make adjustment look different from repeated operation. Cub Cadet therefore has the operator engage for roughly ten seconds, release, and repeat before checking. Perform this only from the operator position in an open area. Never walk to the front while the auger is still moving to “see how much it is spinning.” The failed stop test itself tells you to shut down first.
A machine that will not drive the auger when commanded has an engagement/transfer problem: cable slack, belt, shear hardware or related drive components may be responsible. A machine that drives normally but continues after release has a disengagement problem. The cable sits in both diagnoses, but the safe direction of adjustment and the evidence you are trying to create are different. Linking the pages helps an owner move when an adjustment flips the symptom.
External ice or a damaged/misrouted cable can hold a control from returning fully, so inspect the visible path with the machine disabled before assuming an internal belt brake or clutch defect. Do not spray, bend or reroute parts by guess. If the lever itself does not return normally, the cable is kinked/frayed or the bracket has shifted, that physical evidence is more useful than repeatedly changing tension. Correct or service the damaged control path before another powered release test.
If adding documented slack achieves zero motion but engagement becomes weak, you have reached an important boundary rather than a reason to accept a compromise. A setting that stops safely but will not drive the auger is not finished, and a setting that drives strongly but leaves residual rotation is not safe. Return to the exact 31AM5HVRB10 manual and the separate engagement troubleshooting path. If both states cannot coexist within the documented adjustment, service should inspect the cable, routing, belt/control hardware and related disengagement components.
Preserve the exact test outcome for service: whether both controls were released, whether the cable was tight or slightly slack at rest, whether moving the bracket upward changed stop time, and whether engagement remained normal afterward. Those observations tell a technician far more than “the auger keeps spinning.” Because the product page also ties 31AM5HVRB10 to manual form 769-26795, keep the serial number with the model so a later manual revision or service bulletin is not mixed with a visually similar 2X machine.
Before you order parts
Before buying a new cable, verify exact model 31AM5HVRB10 and reproduce the stop test with both controls fully released. Normal single-hand/interlock behavior should not be mistaken for a failed cable.
Do not buy a belt solely because the auger will not stop. First inspect released cable slack and perform the documented bracket adjustment. Belt/drive service becomes more relevant when correct cable geometry cannot provide both engagement and release.
Do not shorten or tighten the cable because the auger once failed to engage if the present complaint is residual rotation. The two symptoms require different evidence and over-tension can worsen the no-stop condition.
If the cable or lever is visibly damaged, kinked or unable to return, replace/service the damaged control through Cub Cadet’s exact-model parts route instead of trying to tune around the physical defect.
Back to the exact model hub →Retest without creating a second problem
After adjustment, repeat the manual sequence: cable released with very little slack but not tight, several approximately ten-second engagement/release cycles, then a zero-motion verification.
If any auger motion remains after release, shut the engine off immediately and do not continue snow clearing. Another pass is not a valid way to see whether the problem warms out.
Once zero-motion release is achieved, verify the auger still engages normally from the operator position. Weak engagement means the setting needs the separate engagement path or service, not acceptance.
Record model/serial, bracket direction, released cable condition and final stop/engagement results. If no adjustment yields both safe stop and reliable engagement, use Cub Cadet service with those measurements.
Make sure this is the right symptom
The same search phrase can lead to a different branch on another machine. Compare the nearest model-specific examples: Ariens Deluxe 24 (921069): auger keeps spinning after release · Husqvarna ST 224 family (970528602 / 961930096): auger keeps spinning after control lever release.
Model-specific notes
- This is the opposite failure mode from an auger that will not engage on 31AM5HVRB10. One is a failure to stop safely after release; the other is a failure to transmit auger drive when commanded.
- Cub Cadet’s official 31AM5HVRB10 page lists single-hand operation as standard. Make sure both operator controls are released before deciding that continued rotation is a disengagement fault.
- The released-cable target is not “as tight as possible.” The official procedure says very little slack but not tight, then requires a zero-motion auger check after cycling the control.
- Any visible auger motion at the failed stop check is enough to end the powered test. The procedure tells the operator to shut the engine off immediately before readjustment.
- If adding enough slack to stop the auger also prevents normal engagement, do not split the difference and operate an unsafe setting. That conflict is service evidence.
Questions people get wrong on this model
Is it normal for the Cub Cadet 2X 24 auger to spin a little after I release the lever?
For the 31AM5HVRB10 adjustment check, Cub Cadet requires the auger to be completely stopped with no signs of motion after the control is released. First release both operator controls so the model’s single-hand operation is not intentionally holding engagement. If the auger still moves, shut the engine off immediately and correct the control-cable adjustment before using the machine again.
Should the auger-control cable on 31AM5HVRB10 be tight when the lever is released?
No. Cub Cadet’s 31X adjustment procedure says the released auger-control cable should have very little slack, but it should not be tight. A taut released cable can keep tension in the engagement system. With the engine disabled, use the documented cable-bracket adjustment and then repeat the full engage-release test rather than judging the setting by cable feel alone.
Which way do I move the Cub Cadet auger cable bracket if the auger will not stop?
The Cub Cadet procedure says moving the auger-control bracket upward provides more slack, while moving it downward increases cable tension. If the auger still rotates after release and the cable is too tight, the stop-side correction is toward more slack. Make only the documented adjustment with the engine disabled, retighten the bracket, then repeat the complete zero-motion verification.
What if the Cub Cadet auger stops after adjustment but now will not engage?
That means the setting has not produced both required states. Do not keep operating because the auger now stops; excessive slack can create a separate engagement fault. Use the 31AM5HVRB10 auger-wont-engage path to check the cable and drive-transfer side, and escalate to Cub Cadet service if safe release and reliable engagement cannot both be achieved with the documented adjustment.
Primary-source trail
Manufacturer material used for this diagnosis. Verify the model/serial range before ordering parts or applying an adjustment.
Cub Cadet 2X 24 IntelliPOWER product + manual pageExact model 31AM5HVRB10, engine 875-W0, friction-disc drive, overhead-crank chute and official manual forms 769-26924, 769-26938 and 769-26795.www.cubcadet.com →Cub Cadet operator-manual lookupOfficial manual resolver. Enter the exact 11-character product ID and serial number before using an engine or snowblower manual revision.www.cubcadet.com →Cub Cadet 31X 500/600/800 setup and auger-control adjustmentOfficial Cub Cadet setup/adjustment document for the 31X architecture. The auger-control check requires very little released cable slack, no tight cable, and zero auger motion after release before adjustment is accepted.www.cubcadet.com →Cub Cadet: Troubleshooting Auger or Drive LossOfficial companion troubleshooting route for control cable and drive-transfer faults; useful after the safety stop test identifies an adjustment problem.www.cubcadet.com →